Featured Post

Braised Duck with Sea Cucumber (桷参鸭)

Ingredients: 1/2 duck (~500g), washed and chopped into smaller pieces 2-3 sea cucumbers, already hydrated from FairPrice, cut into chunks....

Monday, November 25, 2019

Homemade Chicken Stock


Ingredients:

  • 7 pieces of chicken carcasses (bought from wet market costs about $3.00 OR 4 chicken carcasses and 1 dozen of chicken feet
  • 3 stalks of spring onion (rinsed)
  • 2 stalks of coriander roots (rinsed- optional)
  • 2 bulbs/ 10 pieces of garlic (rinsed)
  • 2 inches thick ginger (remove skin and smashed)


Method:

  • Blanched chicken carcasses and chicken feet to remove blood. Remove, rinsed and set aside. 
  • Boil about 2 liters of water in a fresh pot. 
  • Placed ingredients spring onion, coriander, ginger and garlic and blanched chicken into the fresh pot of water.
  • Bring to a rolling boil for 25mins and lower heat to a simmer. Simmer gently on stove-top for 1-2 hours.


Note: 
I prefer to use a thermal to pot to cook chicken stock. Bring the ingredients to a boil for 15mins. Then transfer to outer pot for at least 6 hours. Reheat thermal pot. Bring to a rolling boil and transfer to outer pot for it to continue to cook for another 6-8hours for thicker broth. You can reheat the third time and chicken stock is good to use. 

Tuesday, November 5, 2019

Airfry Chicken Lollipops


Running out of ideas for dinner πŸ˜› decided to do a fuss-free dinner by airfrying these chicken lollipops! Simple marination of chicken drumlets using salt, pepper and Nomu poultry rub, which is a convenient mix of spices and herbs in a bottle!

Bored of using just salt and pepper for your meals? Prepare a dish with Nomu spices* and you could be one of the 3 lucky participants to win Nomu products worth $80! Nomu products are available at Fairprice Finest and Redmart/Amazon. @Nomusg #nomu

Contest details: https://www.facebook.com/notes/singapore-home-cooks/nomu-contest/2492476904154704/

Ingredients:
12 chicken drumlets

Seasonings:

  • 1 tbsp Melted butter 
  • 1 tbsp Nomu Poultry rub
  • 1 tbsp Garlic powder
  • 1/2 tbsp Sea salt
  • 1/2 tbsp Black pepper
  • 1 tsp dark soy sauce (for colour) 
  • 1 tsp Paprika (optional) 

1 tbsp honey mixed with 1 tbsp water for basting wings

Method:

  1. Rub drumlets with salt to remove grim and smell. Rinsed and pat dry. 
  2. Use scissors to snip heather skin at the end of the bone. Gently snip around the bone and push the skin and flesh downwards to form a round ball like a lollipop. 
  3. Tip: Use a fork and poke the drumlets to enable seasonings to penetrate into skin since we have little time to marinate the drumlets. 
  4. Mix seasonings in a bowl. Add drumlets and mixed well to coat. Set aside for 15mins. 
  5. Preheat airfryer at 190 degrees for 5 minutes. 
  6. Spray some oil on the wire mesh of the basket of airfryer before placing marinated drumlets to airfry. 
  7. Airfry for 10mins and flip to ensure even colour. 
  8. Continue airfry for 5 mins. 
  9. Badge wings with honey water and airfry another 5-7mins. Serve hot. 

Tuesday, October 29, 2019

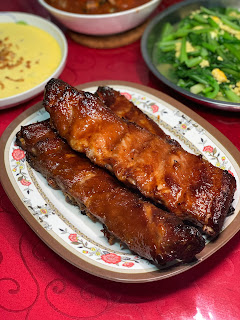
Grilled Pork Ribs (Collaboration with Nomu Spice)


Grilled Pork Ribs served with Japanese potato salad and grilled veggies! Let the oven do the work dinner (cos I need to “study for exams” πŸ˜ͺπŸ˜‘πŸ˜£) 又是ι™ͺε€ͺε­θ―»δΉ¦ηš„ζ™šι€! 😬😬

Dinner is easy cos just popped pork ribs into oven and continue revision with son whos having last papers this week! Using Nomu Poultry rub, salt and pepper and some other seasonings to marinate pork ribs since Saturday night and the ribs are moist and super ε…₯ε‘³ πŸ˜‹! Best to eat using your fingers!

Bored of using just salt and pepper for your meals? Prepare a dish with Nomu spices* and you could be one of the 3 lucky participants to win Nomu products worth $80! Nomu products are available at Fairprice Finest and Redmart/Amazon. @Nomusg @Nomu Sg #nomu

Contest details: https://www.facebook.com/notes/singapore-home-cooks/nomu-contest/2492476904154704/

Ingredients
1 kg of prime pork ribs

Marinade Rub
  • 1.5 tbsp brown sugar
  • 4 tsp Nomu Poultry Rub (reserved 1 tsp to sprinkle on top of ribs before grilling) 
  • 1 tsp Nomu sea salt 
  • 1 tbsp onion powder
  • 1 tbsp garlic powder 
  • 2 tbsp ketchup 
  • 2 tbsp BBQ sauce (any brand)
  • 1 tbsp of tapioca flour 
  • 1 tsp bicarbonate soda (optional) 
Method:
  1. Rinsed and pat dry pork ribs. Used a knife to remove the membrane at the back of the ribs. Use a fork to poke at the flesh part of the ribs to ensure that the marinade be absorb into the ribs. ya
  2. Mix the marinate rub in a bowl.
  3. Place pork ribs into a ziplock bag. Pour marinade rub evenly onto ribs. Gently rub and coat ribs fully with marinade. Flattened and squeeze out the air in the ziplock bag. I double-bagged it to ensure that it doesn’t leak. 
  4. Leave the marinated ribs in the chiller overnight. (I marinated it on Saturday night and grilled for Monday dinner.) 
  5. Bring the ribs out to the countertop 30mins before grilling. 
  6. Lay a piece of baking paper on top of aluminum foil. Place marinated ribs on baking paper. Sprinkle a tsp of Nomu poultry rub on ribs. Wrap and fold up the ends of the aluminum foil to secure it firmly. 
  7. Reserve the excess marinade into a bowl. 
  8. Place on baking tray with wire rack. Grill in preheated oven of 210 degrees Celsius for an hour and 15mins. 
  9. When time is up, remove ribs from oven. 
  10. Open up and transfer ribs onto wire rack in the baking tray. Do not discard the liquid that from grilling ribs that is in the aluminum foil. 
  11. Place ribs back into oven. Continue to brown ribs at 190 degrees Celsius. 
  12. Prepare 2 tbsp of honey mixed with 2 tbsp of water. Pour the excess liquid from the aluminum foil to mix together with the honey mixture. Used this mixture to baste the ribs evenly twice while browning the ribs. 
  13. Remove ribs once it’s brown to your desired liking. Cover with a luminous foil and set aside for 10mins to rest the ribs. 
  14. Sliced and serve! πŸ˜‹ 
  15. If you prefer to have a sauce to go with the ribs, combine the remaining honey mixture with the reserved marinade. Bring to to a simmer in a saucepan and adjust and thicken the sauce accordingly. 


Saturday, October 26, 2019

Simple Turmeric Rice (Collaboration with Nomu Spices)


Simple Turmeric Rice for a rainy day dinner πŸ₯˜
(ι™ͺε€ͺε­θ―»δΉ¦ηš„ζ™šι€! 😬😬 Two more papers to go!)

First time cooking turmeric rice and the boys love it! Lovely smell of turmeric filled the kitchen and added Nomu spices for aroma and flavor! Turmeric has many benefits, one of which is boosts brain function! (Which my ah boy needs now 🀣)

Bored of using just salt and pepper for your meals? Prepare a dish with Nomu spices* and you could be one of the 3 lucky participants to win Nomu products worth $80! Nomu products are available at Fairprice Finest and Redmart/Amazon. @Nomusg @Nomu Sg #nomu

Contest details: https://www.facebook.com/notes/singapore-home-cooks/nomu-contest/2492476904154704/

Ingredients:

  • 2 cups of Jasmine rice (rinsed)
  • 1 cup of carrots (diced) 
  • 1 cup of frozen edamame beans 
  • 2 tbsps of butter 
  • 2 tbsp of olive oil 
  • 1/2 cup onion finely diced 
  • 5 cloves of garlic minced 
  • 2 cups of chicken broth (homemade/ store bought) 
  • 2.5 tbsps of turmeric powder (Nomu spice) 
  • 1 tbsp of herbs mix (Nomu ProvenΓ§al rub) 
  • 1 dried bay leaf
  • Salt to taste (to reduce if you used store-bought chicken broth) 
  • Freshly cracked black pepper to taste 

Method:

  1. Rinse rice till water runs clear, drain and set aside. 
  2. Heat a saucepan at medium heat, add olive oil and butter. 
  3. When butter is melted, add onion and garlic, sautΓ© until softened. 
  4. Add rice and turmeric. Mix until well combined and rice is nicely coated with turmeric. 
  5. Add carrots, chicken broth, bay leaf and hens mix. Give it a quick stir and cover pan. Increase heat and bring to a boil. 
  6. Reduce heat and lower to a simmer for 15-20 minutes or until liquid is absorbed. In between simmering, add thawed edamame beans on top and cover again 
  7. Remove from heat and allow it to sit for 5 minutes. Remove bay leaf, fluff with a fork and serve. 


Saturday, October 19, 2019

Chicken Cheese Balls πŸ§€


[Collaboration with Laughing Cow Cheese]
The littlest boy πŸ‘¦πŸΌ loves laughing cow cheese and also loves chicken ! Combined these two to have Chicken Cheese Balls for his snack-time! 😊 Did the healthier version which is to airfry rather rehab deeply-fry! You can also deep-fry if you like.

For the month of October (whilst stock last), purchase any two boxes of The Laughing Cow 8 Portions to redeem a free The Laughing Cow dorayaki pancake (worth $2) from Bakery Cuisine.
#thelaughingcow #snackyourway

Follow me on:
Instagram: https://www.instagram.com/seok_bin/
Facebook: https://www.facebook.com/quek.bin.1
Ingredients:
  • 500g of minced chicken (you can use store-bought or use a food processor to mince chicken breast) 
  • 3 stalks of spring onion (chopped) 
  • 2 cups of flour
  • 2 tbsps of milk (I used Meiji fresh milk) 
  • 4 wedges of original Flavour (smooth & creamy) Laughing Cow Cheese 
  • 1/2 tbsp of Baking powder
  • 1 tsp of salt 
  • 1 tbsp of garlic powder 
  • 2 tbsps of olive oil 
  • 2-3 packets of crackers/biscuits (use a rolling pin/ a cup to smash into crumbs before opening up and pour into a plate) 
Method:
  1. In a large bowl, whisk together flour, baking powder and salt. 
  2. Mix in minced chicken and one wedge of Laughing cow cheese with your hands. 
  3. Add in garlic powder, olive oil and spring onion. Mix till well combined. 
  4. Add in milk gradually and mix till it comes together like a dough. You might not use al the milk. 
  5. Heat airfryer at 190 degrees for 5minutes.  
  6. Slice the remaining cheese wedges into about 1cm size. 
  7. Prepare a small bowl of water. Wet hands and take some chicken mixture and form into a ball. Use index finger to press into the middle to make a hole. Stuff a piece of cheese and roll into a ball. Coat chicken balls with biscuit crumbs. Set aside on a plate. 
  8. Spray a piece of baking paper lightly with some oil. Place chicken balls on baking paper and spray some oil. 
  9. Airfry chicken balls for 7-10 mins, timing depends on size of chicken balls. Flip at least once during airfrying. Serve hot with mayonnaise or chili sauce. 


Tuesday, October 1, 2019

Easy Fresh Fruits Agar-agar πŸ“πŸ


Ingredients
  • A bunch of fresh longans
  • A box of fresh strawberries
  • A quarter of fresh pineapples (can replace with can ones) 
  • 2 packets of agar agar powder 
  • 400g of sugar 
  • 4 pandan leaves (tear and tied in knot) 
  • 2 liters of water 
  • A mould 
Method
  1. Diced and cut the fruits into smaller prices. I used about 1.5-2cups of fresh fruits each (estimation after cutting).  
  2. Dissolve agar agar powder in water and heat over low heat with pandan leaves. At the same time, stir and dissolve 400g of sugar. You can adjust the amount of sugar accordingly to your taste. I didn’t follow the instructions on the packaging and used less sugar as the fruits natural sweetness will give the agar agar sweetness. 
  3. Allow the mixture to cool for about 5-10mins. 
  4. Pour agar agar mixture to about half of mould. Add the fruits into mould randomly. Allow to cool for about 5mins. After 5 minutes, use a spoon to stir gently to ensure fruits are evenly mixed. Let the mixture continue to cool down for next 3 minutes. 
  5. Pour the rest of the mixture into the mould and add fruits randomly. Repeat the stirring for next 5 mins. By this time, agar agar will start to set. Chill in fridge to let it set. Un-mould agar agar carefully onto a plate when ready to eat. 

Soy Sauce Chicken / See Yau Gai


Ingredients:
  • 1 spring chicken/ 4-6 chicken legs.
  • 1 cup of light soya sauce 
  • 3 tbsp of dark soya sauce
  • 4 cups of water
  • 10 cloves of garlic, skin on
  • 4 slices of ginger
  •  8 dry rose buds/ 2 tbsps of rose wine 
  • 1 tbsp of rock sugar
  • 3 stalks of spring onion 
Method:
  1. Combine ingredients, except chicken into a pot and bring it to a boil for 10mins. 
  2. After sauce is ready, hold chicken by the neck and gently dip into sauce for several time. You can also use a ladle to scoop sauce and drizzle over chicken to get an even color. Then gently place chicken into pot. 
  3. Once sauce reboils, lower heat and continue to cook at low fire for 20mins. Ensure chicken is fully submerged in sauce during cooking. Off heat after 20mins. 
  4. Remove chicken and let it cool off a little before chopping into pieces for serving. Set aside. 
  5. Scoop some sauce into small saucepan. Heat saucepan. Once sauce boils, thickened sauce with potato or corn starch water to form a thick gravy. Off heat and drizzle gravy over chopped chicken.
  6. For the remaining sauce, I added taupok, tau gua and hard boiled eggs and braised them as additional sides. Enjoy the yummy chicken! πŸ˜‹
Note: You can keep the remaining sauce in the fridge to use for the next day. Add more ingredients for another meal for the next day.

Thursday, September 26, 2019

Simple steamed chicken drumsticks πŸ—


Ingredients
  • 4 chicken drumsticks πŸ— 
  • 3 tbsp minced garlic 
  • 4-5 slices of ginger 
  • 2 tbsp light soya sauce
  • 1 tbsp oyster sauce 
  • 1 tbsp ginger juice 
  • 1 tbsp cooking wine 

Method: 

  1. Cut at the joint to divide into two pieces. Rub chicken drumsticks with salt and rinsed off. Marinate chicken drumsticks with seasonings and minced garlic for at least 4 hours. 
  2. Remove from chiller 30mins before steaming. Top with sliced ginger and Steam at high heat for about 20 mins (depends on how many pieces of chicken you have. Off heat and leave in steamer for 5 mins. 
  3. Garnish with spring onion before serving. ☺️

Sunday, September 22, 2019

Sardines Sushi Rice Cake πŸŽ‚


Happy 14th birthday to my gal! πŸ‘§πŸΌπŸ₯°πŸ₯°πŸ₯° Mama has no time to bake a birthday cake for you so made a sardine sushi rice cake instead 😁😁 (since sardines is one of your favorite food! πŸ€ͺ) Ah gal happily packed the sushi cake to celebrate with her friends πŸ‘«! πŸ˜…πŸ˜…

Stand a chance to be one of the 5 winners to walk away with $100 NTUC Vouchers by participating in Ayam Brand’s Bento Contest! Simply prepare and post an image of a bento using Ayam Brand Sardines (120g). Hurry, contest ends 22 September! Ayam Brand is also having the same contest that is open to the public. You can participate by simply reposting your submission on your personal page! Remember to tag them @ayambrandsg and hashtag #ayambrandbento and you will also be in the run to win a 3D2N staycation at Shangri-La hotel (Themed Family Suite), worth $3,000! Visit Ayam Brand Singapore to find out more! #ayambrandsg #ayambrandbento

Ingredients:

  • 1 can of Ayam Brand Sardines (120g)
  • 1 medium-size tomato (chopped)
  • 1/2 Japanese cucumber (sliced)
  • 3 tbsps of ebiko (optional) 
  • 1 cup of Japanese sushi rice (cooked and stir in a tbsp of sushi vinegar when it’s hot)
  • 3 shallots (chopped)
  • A round shaped cutter or a round deep Medium-size bowl 
  • Seasonings - 1 tbsp of ketchup, 1/2 tbsp oyster sauce, 1/2 tsp of sugar and pinch of salt. 

Method:

  1. Remove sardines and placed in a bowl. Used a fork and break sardines into smaller pieces. 
  2. Heat up a tbsp of oil in a small saucepan. 
  3. Add chopped shallots. SautΓ© till fragrant. Add sardines and add all the seasonings. Mix well. Also add in the remaining sauce in sardines can. Off heat. 
  4. Assembling the sushi cake: Brushed a thin layer of oil on the round cutter. Placed round cutter on a plate. Add 1/2 cup of rice to form the base. Use a spoon to press and even out the rice. Add chopped tomatoes and the sliced cucumbers. Add 1/2 cup of rice again and press down using a spoon. Add cooked sardines. Then top with last layer of rice. Topped with Ebiko. Slowly remove the round cutter. Served. 

Saturday, September 14, 2019

Simple Sardines Wrap


Stand a chance to be one of the 5 winners to walk away with $100 NTUC Vouchers by participating in Ayam Brand’s Bento Contest! Simply prepare and post an image of a bento using Ayam Brand Sardines (120g). Hurry, contest ends 22 September! Ayam Brand is also having the same contest that is open to the public. You can participate by simply reposting your submission on your personal page! Remember to tag them @ayambrandsg and hashtag #ayambrandbento and you will also be in the run to win a 3D2N staycation at Shangri-La hotel (Themed Family Suite), worth $3,000! Visit Ayam Brand Singapore to find out more! 

Ingredients: (portion for 2 wraps) 
  • 1 can of Ayam Brand sardines in tomato sauce
  • 2 wraps 
  • 3 pieces of lettuce
  • 6 slices of tomatoes πŸ… 
  • 8 slices of cucumbers 
  • Some breadcrumbs and cornflour 
  • A pinch of salt and pepper and mayonnaise 
  • Side-dishes: sliced apples and steamed corn with salted butter 

Method
  1. Drained sardines of sauce. Sprinkle a pinch of salt and pepper over sardines. Lightly coat sardines with some cornflour and coat with breadcrumbs. 
  2. Heat up about 2 tbsps of oil in medium heat. Panfry sardines till breadcrumbs are crispy and brown. Set aside on kitchen towel. 
  3. Lightly toast wraps on another pan/ in toaster. 
  4. Assemble wrap in order: lettuce, tomatoes, cucumbers and sardines. Optional: Top with mayonnaise or sauce from sardines can. You can use any other vegetables for your preference. Wrap it up by folding the sides and into a roll. I used a  piece of aluminum foil to secure it. 

Sunday, September 1, 2019

Grilled Pork & Chicken Fajita Skewers withavocado dip

[McCormick Mexican Vegana Cooking Contest] πŸ‡²πŸ‡½ 
Grilled Pork & Chicken Fajita Skewers with Avocado dip 

New attempt! Mexican cuisine πŸ˜… Surprisingly, all three kids munching their way through the skewers and gave πŸ‘πŸ˜„ Did 2 versions of the skewers, pork and chicken and both tasted great! 
#McCormick Brings Passion to Flavour
#MexicanFlavor #FlavorForcast2019

Ingredients
  • 400g pork belly (remove skin) 
  • 2 pieces of boneless chicken thighs 
  • 1.5 tbsps garlic powder
  • 1.5 tbsps onion powder
  • 1/2 teaspoon dried oregano
  • 1/2 teaspoon smoked paprika
  • 1/2 tbsp sea salt
  • 1/2 tbsp black pepper
  • 2 Tablespoons olive oil
  • 1/2 red bell pepper cut into 1 inch cubes
  • 1/2 yellow bell pepper cut into 1 inch cubes
  • 1/2 green bell pepper cut into 1 inch cubes
  • 1/2 onion cut into 1 inch cubes
Avocado Dip: 
  • 1/4 cup olive oil
  • 1 Avocado (mashed) 
  • 3 garlic cloves (minced finely) 
  • 1/2 cup parsley (minced finely)
  • 1 teaspoon salt
  • 1/4 teaspoon pepper
  • juice of 1 lime
Instructions: 
  1. After rinse and pat dry pork belly, remove the skin and sliced into 1 inch cubes. Do the same for boneless chicken legs. 
  2. In a bowl add pork cubes, garlic powder, onion powder, oregano, paprika, sea salt and black pepper. Toss until coated evenly. Add olive oil and mix well. Do the same for chicken. 
  3. Thread pork and chicken cubes with the peppers and onion alternately on skewers.
  4. Heat up grill pan for five mins. Brush some oil on pan. (I used my Happycall pan to panfry skewers) Grill for 8-10 minutes, flipping to ensure that skewers are cooked on all sides. Remove from the grill and serve with avocado dip. Serve hot. 
  5. To make the avocado dip: Mashed avocado with a fork. Add the olive oil, garlic, parsley, salt, pepper and lime. 

Sunday, August 18, 2019

One-pan Mexican Chicken and Rice

{McCormick Mexican Vegana Cooking Contest} : 
One-Pan Mexican Chicken and Rice 
Never done Mexican Dish before! πŸ˜… An boy’s feedback, thumbs up for first attempt! But, please cook more chicken! But, my fridge only left 2 pieces of boneless chicken legs ! πŸ˜‚πŸ˜¬

Ingredients:
  • 2 chicken thighs (boneless and skin on) 
  • 1.5 cups of pearl rice / short-grained rice 
  • 1.5 cups of chicken stock 
  • 1/2 yellow onion (diced) 
  • 1/2 red capsicum (diced) 
  • 1/2 cup corn (you can use either fresh corn or can ones) 
  • 1 tbsp minced garlic 
  • 1/2 tbsp garlic powder 
  • 1/3 tsp paprika 
  • 1 1/2 tbsp olive oil 
  • 1 tsp dried oregano
  • 1.5 tbsp onion powder 
  • Sea salt
  • Black pepper 
  • Parsley chopped for garnishing (optional) 
Method:
  1. Rinsed rice and drained. Set aside. 
  2. Season chicken thighs with garlic powder, oregano, paprika, sea salt (about 1.5 tbsp) and black pepper (about a tbsp). Salt and pepper is estimated as I used McCormick seasalt grinder and black pepper grinder. Set aside while preparing other ingredients. 
  3. Heat cast iron skillet or Dutch oven. (I used my non-stick pan as I don’t have either one.) Add chicken, skin-down and cook till brown for 4-5 minutes. Flipped over and cook for another 3-4 minutes. Remove and set aside. 
  4. Preheat oven to 230degrees. 
  5. Add oil to same pan. Add in onions and cook for 3-4minutes. Once onions soften, add in garlic. Cook for about a minute. 
  6. Add in uncooked rice, red pepper, corn and cook for a minute. Pour in chicken stock. You can use either store-bought chicken stock (e.g. Swanson’s brand) or homemade chicken stock. If you use store-bought chicken stock that contains salt, please adjust salt accordingly. 
  7. Seasoned with a tbsp of salt, 1.5 tbsp onion powder and black pepper to taste. Bring to a boil and off heat. Placed chicken on top of rice, skin side up. Baked in oven, covered with foil for 30-35mins. (** I transferred the rice to an oven-proof dish and placed chicken on top. Then baked covered with foil in oven.)  
*Note: As oven temperatures differs, please adjust baking time accordingly. If you prefer softer texture of rice, please bake longer.
#McCormick Brings Passion to Flavour #MexicanFlavor #FlavorForecast2019


Sunday, August 4, 2019

Char Siew Pork Ribs


Ingredients:
  • 6 Slabs of pork ribs (about 2kg pork ribs)
  • 3/4 bottle of hoisin sauce (Lee Kum Kee brand) 
  • 1/2 bottle of char siew sauce (Lee kun Kee brand) 
  • 1/2 cup of soya sauce 
  • 2 tbsp of chinese cooking wine 
  • 2 tbsp of honey
  • 2 tbsp of brown sugar
  • 4 tbsp of minced garlic
  • 2 tbsp of garlic powder
  • 2 tbsp water 
  • 1 tsp of five-spice powder
Additional glaze (to prepare in a bowl):
  • 2 tbsp of honey
  • 1/2 bottle of char siew sauce
  • 1 cup of marinade from ribs
  • 2 tbsp of water 
Method:
  1. Combine hoisin sauce, char siew sauce, soya sauce, cooking wine, honey, brown sugar, garlic, garlic powder, water and five-spice powder in a bowl. Whisk well to combine. 
  2. Rinse and pat dry pork ribs. Placed on a big plate. Pour half of the marinade on the ribs and and coat well. Transfer ribs into a jumbo ziplock bag and pour the remaining marinade into bag and make sure that ribs are well-covered with marinade.  Zipped bag and refrigerate overnight for best results. 
  3. Remove pork ribs from fridge 30mins before grilling. 
  4. Preheat oven at 200 degrees, top and bottom heat. 
  5. Drain ribs from marinade. Transfer ribs into an over-proofed dish/tray, line with baking/parchment paper. Cover with aluminium foil and use a fork to make some holes to allow heat to release from ribs. Grill ribs for 1.5hours covered. 
  6. Remove cover after 1.5 hours. Transfer ribs onto baking roasting tray with rack. Baste with prepared glaze and place back into oven at 220 degrees. Rotate and flip in between grilling. Continue to baste ribs with the glaze to ensure it achieve even colour. 
  7. Remove from oven once ribs are brown. Allow it to cool slightly before serving. 
** Note: Oven temperatures varies. Adjust time and temperatures accordingly during grilling.

Steamed sliced fish with ham


Ingredients: 
  • 400g of Sliced fish fillet ( I used batang fish fillet) 
  • 4 slices of picnic ham 
  • 5 slices of ginger 
  • Spring onion for garnishing (optional) 
Marinade for fish: 
  • Dash of salt, pepper and rice wine
  • A tsp of oil 
Seasonings: 
  • 1 tsp oyster sauce
  • 1/2 tsp light soya sauce
  • 1/2 tsp sugar/ rock sugar
  • 1 tsp of water
  • Dash of sesame oil 
Method: 
  1. Rinse fish and cut into slices. Alternatively, purchase vacuum-packed sliced fish fillet from #haisiaseafoodsupplies online, which is conveniently packed for cooking. Add marinade and set aside for 15 mins. 
  2. Sliced picnic ham into quarters. 
  3. Mix seasonings in a bowl. 
  4. Arrange sliced ginger onto steaming plate. Arranged sliced fish and ham alternatively together on top of ginger slices. 
  5. Bring water in steamer to a boil. Steam fish over high heat for 6 minutes. In the meantime, use a small saucepan to heat up the seasonings (oyster sauce, light soya sauce, sugar and water. Stir in sesame oil and turn off heat. Pour over fish when the 6 minutes is up. 
  6. Served hot and garnish with spring onion. 


Friday, July 12, 2019

Ginseng Steamed Prawns 🦐 {Collaboration with Huiji)


{Collaboration with Huiji}
“ Quick and fast” Ginseng Steamed Prawns 🦐

Using Huiji Canadian Ginseng Revitalizing Tea to do a quick and fast steamed prawn dish after rushing back home from whole day’s PSG meeting πŸ˜…! Created this dish for hubby’s sisters and myself as we have been so busy with work πŸ˜‰

Huiji Canadian Revitalizing Tea is good for whole family, of which it can help reduce body heat, in Singapore where it is hot and humid! It also can improve energy level, so it’s beneficial to those who stayed up late, super busy at work or kids’ exam period. Made with 100% Canadian ginseng and it’s a healthier choice as it contains no sugar.
#huiji

Ingredients:

  • 500g medium-size sea prawns 
  • 1 packet Huiji Canadian Ginseng Revitalizing Tea
  • 2 pieces Yan rhizome (山药) 
  • 3 pieces Yuzhu (ηŽ‰η«Ή)
  • 1 cup water (240ml) 
  • 1 tbsp wolf berries 
  • 4 slices ginger
  • Seasonings: 1 tbsp Huadiao wine, 1/2 tbsp fish sauce, a pinch of salt. 

Method:

  1. In a cup/bowl, soak Huiji Canadian Ginseng Revitalizing Tea, Yan rhizome and Yuzhu in hot water. Set aside till water is cooled. (Remember to give the greats a quick rinse before adding water.) 
  2. Placed prawns in a heat-proofed bowl. Pour the cooled herbal broth onto prawns. Add ginger slices, wolf berries. Add seasonings. 
  3. Steam prawns for about 5-6 minutes, covered with baking/cooking paper. 
  4. Served hot. 

Sunday, June 9, 2019

Traditional Hokkien Bak Zang (传统福建粽子)


Making bak zang has been my family tradition for many many years. My mother insisted my two sisters and I, to learn this skill since we were in primary school! We started making small tiny gee zangs (η’±ζ°΄η²½) when we were young and progressed to making bak zangs (bui ba and cui ba). Since then, we have not stopped making them as family and friends loves them. The taste is made to suit our family. We omitted five-spice powder as my late Ah ma didn’t like it. I am penning this recipe so as to ensure that this will be pass down to whoever is interested in this as my mother is getting on her years. To make bak zangs, the preparations starts 2-3 days before, and every year, we make about 10kg of rice and more than 250 bak zangs!

These ingredients are flexible and you can change to cater to your taste. I don’t have the exact measurements of the ingredients and sauces as my mother will add based on her gut feel. Please trial and error and adjust accordingly to your taste. This recipe is more for documenting down the steps involved.

Preparation of bak zang leaves n strings:
Soak dry bak zang leaves overnight. Wash and rinsed each piece of leaves using a cloth to remove dirt. Change to fresh pail of water if it’s very dirty. Set aside when leaves are all cleaned by soaking in fresh pail of clean water. As for strings, we prefer to use the traditional strings for bak zang, rather than raffia strings as the colorings from the strings will dissolved during cooking which is unhealthy.

Preparation of ingredients:
  • Blanched pork belly (三层肉) to remove blood and allow it to cooled. Sliced into smaller pieces (about a inch thick). Marinate with some dark soya sauce overnight. 
  • Prepare pork lard oil the night before.
  • Mushrooms to soak the night before and reserve the soaking water. Marinate mushrooms with 1-2 tbsps of dark soya sauce about an hour before stir frying. 
  • Chestnuts/gao luk (wash and soak with hot water). Boil chestnuts. Deshell when cooled the night before.  
  • Dry oysters (rinsed and soak)
  • Dry shrimps/haebi (rinsed and soak with warm water. Reserve soaking water)
  • Lots of garlic, peeled and lightly smashed 
  • Few bunches of pandan leaves 
Stir fry ingredients before wrapping: 
  1. Heat wok with 2 tbsps of pork lard oil. Add 8-10 cloves of smashed garlic and sautΓ© till fragrant. Add 2 tbsps of dark soya sauce (ε€§εŽη‰Œ) and let it caramelized. Add marinated pork belly and stir fry. Add dashes of white pepper, salt and oyster sauce. Add in some water from soaking shrimps and mushrooms and simmer pork belly for about 5 mins. Off heat and set aside.
  2. Heat wok with 2 tbsps of pork lard oil. Add some cloves of smashed garlic and sautΓ© till fragrant. Add about a tbsp of dark soya sauce to caramelize. Add marinated mushrooms. Add a dash of pepper and salt and stir fry for few mins till mushrooms are coated with sauce. Off heat and set aside. 
  3. ** Repeat the same for other ingredients; chestnuts, dry oysters and stumps. 
  4. Wash and rinse glutinous rice well and set aside. Heat wok with some pork lard oil and add cloves of smashed garlic. Add 2 tbsps of dark soya sauce and let it caramelized. Add rinsed glutinous rice and stir fry to mix well for two mins. Add some salt, pepper and 1-2 tbsps more dark soya sauce (not too much, it’s more for adding color to rice). Off heat after rice is well mixed. 
  5. Start to wrap when all ingredients are ready. Put rice at bottom of leaves. Then some of each ingredients. Top with rice again and wrap. Try not to stuff too much rice as rice will expand once it’s cooked. And my advise is not to wrap dumplings too tight since rice will expand and it will not maintain the shape you wrapped when it’s too tight. It will also risk of dumplings bursting during cooking when it’s too tight. 
  6. In the meantime, prepare a big pot of water to cook the dumplings. We used the traditional way which is using charcoal. You can also cook the dumplings using stove. 
  7. Add 2-3 bunches of washed pandan leaves to big pot of water and bring it to a boil. Add about 1-2 tbsps of salt. Tie individual bunches of dumplings together and lower to hot boiling water. Boil dumplings in water for about 2 hours till it’s cooked. Once cooked, remove dumplings and hang  on a hook and let it drip dry. 
Hope you understand the recipe. Not sure if you know how to wrap the dumplings ? 😊 
I made a simple video of me 
https://www.facebook.com/quek.bin.1/videos/10209480118535548/

Friday, May 31, 2019

Coconut Bunnies Agar Agar (Collaboration with Ayam Brand)

[Contest] Coconut Bunnies Agar Agar for Ah Bu’s belated birthday celebration πŸŽ‚
Didn’t celebrate my mum’s birthday, which was 2 weeks back as the kids were all having their examinations. Today we’re having a belated birthday celebration for her and made these bunnies agar agar with Ayam Brand coconut milk to give her a surprise! ☺️☺️ My ah bu is an expert in agar agar and she used to make these for our birthdays! First attempt on making these and based on my memory of how she made these before. πŸ˜… hope she’ll like it!
#ayambrandcoconutmilk

Note: 
You will need 2 bunny mould and 2 heat-proof containers for grass and flowers.

Ingredient A (for bunnies' eyes, flowers and grass): 
  • 300ml water 
  • 2 pandan leaves (washed and tied into knots) 
  • 1.5 tbsp sugar
  • 0.5 tbsp agar agar powder
Ingredient B (for bunnies' bodies): 
  • 660ml Ayam Brand Super Light Coconut water (2 packets)
  • 2 tbsp agar agar powder
  • 3 tbsp sugar (2.5 tbsp for less sweet) 
  • 2 pandan leaves (washed and tied into knots) 
Instructions: 
  1. Prepare the ingredients A first. Boil water in a small pot with pandan leaves. 
  2. Once boiling, add sugar and agar agar powder. 
  3. Lower to a simmer and dissolved the powder and sugar. Off heat. 
  4. Scoop 2 tbsp agar agar water into small bowl. Add about 2 drops of red colouring and mix well for the bunnies' eyes. Use a tiny spoon and add to eyes of bunnies. Do for one eye first and allow it to set before doing the other eyes. Challenge here is to do fast as the agar agar mixture will solidify once it cools. You can heat up the mixture if it started to harden. 
  5. Divide the rest of the agar agar mixture into 2 heat-proof containers. Add green and orange colours into mixture for the flowers and grass. Mix well and allow mixture to cool down and solidify. 
  6. Chill in fridge after agar agar is set. 
  7. Prepare ingredients B. Add Ayam Brand coconut milk, pandan leaves, sugar and agar agar powder into a pot. Heat pot with medium heat. Stir and ensure powder and sugar dissolve completely. Allow coconut mixture to come to a gentle boil and simmer for 5 mins after it boils. Off heat. Wait for coconut mixture to cool down till its warm but not solidify yet. The reason for this is, if you pour the hot coconut mixture into mould, the agar agar for bunnies' eyes will melt from the heat. Once mixture is cooled enough, pour into mould and allow it to cooled further till it solidify and chill in fridge. 
  8. Remove green agar agar from container about an hour later and use a grater to shred into smaller pieces to make the grass patch. 
  9. Remove orange agar agar from container and use a cookie cutter to make flowers for the grass patch. 
  10. Assemble: gently remove bunnies from mould and place on plate. Add grass patch and flowers around the bunnies. Served cold from fridge. 


Sunday, May 19, 2019

Sliced Fish Beehoon Soup 🍜 (Collaboration)


Ingredients for soup stock:
  • 1 fish head (cut half) or fish bones (at least 800g) 
  • 1 cup of ikan bilis 
  • 3/4 cup of yellow beans (rinsed and soak for 15mins) 
  • 6-8 cloves of garlic (rinsed and smashed) 
  • A thumb-size ginger (rinsed and sliced to thick pieces) 
  • 3 stalks of spring onion
  • 3 pieces of dried sole fish (鳊鱼)
  • 1 pot of boiling hot water (about 2 liters) 

Method: 
  1. Rinsed and pat dry sole fish. Deep fry till crisp and set aside. Alternatively, you can use airfryer but make sure you oil spray fish. I made more of these the last time to keep whatever I want to cook soup. You can grind them to powder form when they cooled down too. 
  2. Rinsed and pat dry fish head / bones. Your soup will be flavorful if you add enough bones. You can choose to Panfry Head/bones but I Airfried instead. 
  3. Heat wok. Add 2tbsps of oil. Add ginger, garlic and ikan bilis. SautΓ© till fragrant. Pour hot boiling water into wok (be careful of the steam so pour slowly). Add fish head/bones, yellow beans, sole fish and spring onion. Let it boil over high heat for 20 mins and reduce to a simmer for about 1-1.5 hours. Sieve the soup when cooled and set aside. 

Ingredients (depends on your preferences) : 
  • Red grouper slices (500g) 
  • Crabsticks/ fishballs 
  • Tomato wedges 
  • Thick beehoon (Blanched with boiling water for 1-2minutes. Drained and add a tsp of garlic oil, mix well and set aside
  • Tofu (cut into small pieces) 
  • Lettuce 
  • 2 beaten eggs for egg-floss 
Method (I cooked one person’s portion at a time) 
  1. Marinate fish slices with some salt. Mix 1 tbsp of corn flour with 1.5tbsp water and add to fish. 
  2. In a separate pot, heat up prepared soup stock. Once it’s boiling, add tofu, fish slices, Crabsticks and whatever ingredients you prepared. 
  3. Add 1-2 tbsp of Marigold  King of Kings Full Cream Evaporated Milk. Add seasonings: 1 tsp fish sauce, 1 tsp light soya sauce and some salt and pepper to taste. Bring to a boil and add a dash of cooking wine (optional). 
  4. Pour soup onto Blanched beehoon. Garnish with chopped spring onion, fried shallots and egg-floss. Served hot with cut chili padi. 
Recipe for egg-floss: 
Ingredients
  • 1 egg and 2 egg yolks
  • A pinch of salt and dash 1/4 tsp vinegar 
  • Oil 
  1. Beat the eggs in a bowl with the seasonings till the mixture is very runny.
  2. Heat the oil in a deep saucepan/wok over low heat until very hot, or until plenty of smoke has risen.
  3. Pour the egg mixture through a perforated ladle, from at least 10cm or more above the saucepan. Stir through the egg mixture with the same ladle to ensure that the egg does not curdle or stick to each other.
  4. Deep fried until the egg turns light brown, switch off the heat. The egg will cook into thin threads. Allow the oil to continue to bubble in the saucepan till the egg threads turn golden brown. Remove the threads from the oil and drain well on paper towels.
  5. Loosen the egg threads into a light, airy floss. Dish and serve.

Tuesday, April 23, 2019

Homemade Macaroni Stars ⭐️ (Collaboration)


My kids loves macaroni! πŸ˜„πŸ˜„ Whose also? πŸ™‹πŸ»‍♀️πŸ€ͺ

First try on making macaroni at home using San Remo Durum Wheat Semolina Flour 😁😁 Making these for a little toddler girl (nephew’s daughter) for her to try as her mummy hopes to feed her homemade macaroni instead of store-bought ones. Using a small star cutter to make these tiny star macaroni which saves time on shaping them! ☺️ hope little girl will like them! My kids were my taster and made simple Mac n cheese with these stars and they loves it!

Lucky Draw!!
[WIN!] Get a chance to WIN* $5,000 FairPrice Gift Vouchers if you purchase at least $3 worth of San Remo products in FairPrice between 5-30 April 2019! *Terms and conditions apply. Refer San Remo for more information! #SanRemoSG #SanRemoPasta #SanRemo

Ingredients:

  • 1 cup of San Remo Durum Wheat Semolina Flour 
  • 1 cup of all-purpose flour (and some extra flour for dusting) 
  • 1/4 tsp of salt 
  • 3 eggs, lightly beaten 
  • 1 tbsp olive oil 

Method:

  1. Combine sifted salt, semolina and all-purpose flour together in a large bowl. Use a fork to mix till it’s well combined.  
  2. Create a well in the centre if the flour mixture. 
  3. Pour beaten eggs and olive oil in the centre of flour mixture. Use the fork to whisk the egg mixture and slowly draw the flour and mix together with the eggs. Mixture will be thin at first but it will slowly thicken and begin to look like dough. Once it begins to look like a soft dough, transfer the dough on a clean surface, dusted with flour. 
  4. Begin kneading the dough by folding it onto itself. Lift one side of the dough and fold towards the opposite side. After each fold, flatten the dough and repeat. This process will toughen up the dough. Sprinkle extra flour on the counter if the dough begins to stick to the surface. Continue to knead till the surface is smooth and resembles a plastic ball. 
  5. Place dough in a clean bowl to rest. Cover the top of bowl with plastic wrap or plate. Allow it to rest for 30minutes. After it has rested, you can use the dough straightaway or refrigerate it for 24 hours. Allow the dough to come to room temperature before forming pasta. 
  6. You can shape the dough into any shape or sizes you like. I used a mini star cutter to make the shape as it is faster this way. Roll flat and thin for half of the dough flat on clean, dusted surface. Cut out the shapes using cutters. Cook macaroni in a pot of salted boiling water for about 8-10 minutes or till it is cooked. Serve macaroni with soup, pasta sauce, carbonara or mixed with cheese and baked in airfryer or oven till cheese melted. 

Sunday, April 21, 2019

Pizza With Mozzarella-stuffed crust {Collaboration}


My first time making pizza crust from scratch using San Remo Durum Wheat Semolina Flour! πŸ˜… Semolina flour gives the crust a nutty, full-bodies richness, perfect with pizza, that calls for a tomato sauce. A request by my gal who’s a fanatic of πŸ• to try making cheese-stuffed crust pizzas πŸ˜…πŸ˜… Ah gal said she likes the crust as it tasted crispy on the outside and soft inside and cheese oozing out πŸ˜‰

Lucky Draw!!
[WIN!] Get a chance to WIN* $5,000 FairPrice Gift Vouchers if you purchase at least $3 worth of San Remo products in FairPrice between 5-30 April 2019! *Terms and conditions apply. Refer San Remo for more information!

#SanRemoSG #SanRemoPasta #Sanremo

Ingredients:

  • 3/4 cup of lukewarm water 
  • 1.5 tsp active dry yeast 
  • 1/2 tsp sugar 
  • 1/4 tsp salt 
  • 1.5 cups all-purpose flour
  • 1/2 cup San Reno Durum Wheat semolina flour 
  • 2 tbsp olive oil, additional for greasing bowl 

Method:

  1. Pour water in a slightly warm, large bowl, or a warmed stand mixer bowl. Stir in the yeast, sugar and salt. Set aside until the yeast is bubbly and foamy, about 5 minutes. If the yeast does not proof, throw away the mixture. (Either the yeast is expired, or the water is too hot or too cold.) 
  2. If using stand mixer, add both sifted flours and oil into yeast mixture, attach dough hook and stir at medium speed until mixture fairly well combined. Continue to knead at medium speed, till dough is smooth and elastic (about 7minutes). If the dough is sticky, add a little flour if needed. 
  3. If using hand-knead, add both sifted flours and oil to yeast mixture and mix till fairly smooth. Lightly dust a clean, dry work surface with all-purpose flour and empty dough on it. Knead by hand, and adding 1-2 tbsp of flour, should the dough gets sticky. Pull the dough with one hand and use the other hand fold and knead into the dough mass. Keep doing for about 8 minutes and work the dough till it’s smooth and elastic. 
  4. Wipe a clean bowl with some olive oil using a kitchen towel. Transfer dough into greased bowl. Turn the dough around till all sides are coated with oil. Cover the bowl with a plastic wrap. 
  5. Set the bowl in a warm area and allow it to proof till double its size (about 1.5 hours). 
  6. After proofing, remove dough into a floured work surface. Shape into a ball. It can be rolled out and baked as desired. I split the dough into halves and rolled to thinner crust. Then I lined mozzarella strips around the sides of and gently wrapped them up all around. 
  7. Baked the pizza in 200 degrees oven with your favorite toppings and sauce for about 20 minutes. (Oven temperatures vary for different ovens) 
  8. For my pizza, I did the basic tomato sauce. Topping include button mushrooms, ham and can pineapples. 

Wednesday, April 10, 2019

Simple Egg Tofu with French Beans (Collaboration)


{Collaboration with Knorr Singapore}
Ingredients: 
  • 2 tubes of egg tofu 
  • 1 packet of French beans (about 20 pieces) 
  • 3-4 cloves of garlic (minced) 
  • 1 tbsp of Knorr SavorRich Chicken Concentrated Seasoning 
  • 1 tbsp of light soya sauce 
  • 3 tbsp of water 
  • A pinch of sugar 
Method: 
  1. Remove egg tofu from packaging by slicing into half horizontally. Sliced half again vertically. Placed on plate lined with kitchen towel to absorb moisture for 5 mins. 
  2. Heat wok with some oil. Gently fried egg tofu till it’s brown. Set aside. 
  3. Remove both ends of French beans. Wash and drain. Sliced French beans diagonally. 
  4. Bring a pot of water to a rolling boil. Add a tbsp of oil and a tsp of salt. Blanched French beans and set aside. 
  5. Plate French beans on plate. Lay egg tofu on top. 
  6. Heat up a small saucepan with 2 tbsps of oil. Add minced garlic and fry on medium heat till garlic is golden brown. Remove and set aside. 
  7. Prepare sauce: Knorr SavorRich Chicken Concentrated seasoning, light soya sauce, sugar and water. 
  8. Heat up saucepan with garlic oil from frying garlic. Heat up prepared sauce. Taste and adjust accordingly. Drizzle sauce over egg tofu and French beans. Top with crispy golden garlic and serve immediately (Optional: Add some corn flour water to thicken sauce.) 
Note: Prepare more sauce and adjust seasonings accordingly if you prefer to drizzle on rice. 😊
#knorrsg #knorrsingapore 

Sunday, March 24, 2019

Shredded Chicken Mushroom Hor Fun (香菇鸑丝河粉)


{Collaboration with Redmart} 
#Freshnessrecognition #redmartcom
Poached chicken using Fresh Kee Song Organic Lacto Whole Chicken and shredded chicken breast to cook this dish! The chicken breast meat is soft and juicy which is prefect for this dish. 😊 With Redmart delivery, I do not have to worry about rushing to market to get my fresh produce 

For this dish, I poached one whole chicken and did two dishes. After chicken is cooled, I removed the chicken breast and shredded for the Hor fun. Some of the chicken stock was used to braise the mushrooms. 

For recipe on poaching chicken, please refer to the link below: 
You can buy a chicken breast from wet market and use the same method of poaching but reduce the cooking time to 8mins, off heat and cover for 10mins. Removed to cool and shred and set aside. 

Braised mushrooms recipe 
Ingredients
  • 10-12 pieces of dried shiitake mushrooms (I used the small ones so that I don’t have to slice into smaller pieces. I Braised about 20 pieces of smaller ones.) 
  • 5 cloves of shallots , sliced 
  • 5 cloves of garlic, minced 
  • 2 slices of ginger 
  • 2 tablespoon oyster sauce
  • 2 teaspoons sesame oil
  • 1 tablespoon light soy sauce
  • 2 teaspoons dark soy sauce
  • 2 small pieces of rock sugar
  • 700ml homemade chicken stock (about 2 cups), plus water from soaking mushrooms. 

Method
  1. Rinse shiitake mushrooms with water. Pour enough water over mushrooms to cover them. Placed a small bowl on top of the mushrooms to submerge them in the water. Soak them overnight until softened. If rushing for time, use hot water. Don't discard the mushroom water!
  2. Slice the softened shiitake mushrooms into thin slices or into halves. I didn’t sliced mine as I used small ones. 
  3. Heat a clay pot with 2.5 tbsps of oil. SautΓ© ginger, shallots and garlic till fragrant. Add mushrooms and Stirfry for 8-10mins. This is to add fragrance to mushrooms and it’ll make the taste of mushrooms smoother. 
  4. Combine the mushroom water, oyster sauce, sesame oil, light and dark soy sauce, and chicken stock from poaching chicken. 
  5. Add to the clay pot, cover and bring to a boil. Turn the heat down and simmer for 1 hour until the mushrooms are incredibly soft and infused with all the flavours. 
  6. If the water is drying up while you are simmering, top it up with more water/ chicken stock to cover the mushrooms. 
Note: 
This can be a standard recipe for braised mushrooms so you can serve the braised mushroom onto rice or tossed into your noodles. You can also top them on vegetables like kai lan or broccoli. 

Assembling the Hor fun: 

  1. Once the braised mushrooms are ready, adjust the taste accordingly by adding more seasonings. As the Kway tiao is plain, I made the sauce slightly more salty as it’ll complement the Kway tiao. Prepare potato starch water to thicken the sauce by mixing 2 tbsps of potato starch to 3 tbsps of water. Add slowly to the mushrooms sauce slowly and stop once the sauce thickens. 
  2. Bring a pot of water to a boil. Blanched caixin/shanghai green and set aside. Blanched thin Kway tiao for a minute and drained. Transfer to plate and add half a tablespoon of shallot oil to Kway tiao. Mixed well. 
  3. Spoon mushrooms sauce on Kway tiao. Add braised mushrooms, shredded chicken and blanched vegetables. Topped with fried shallots and served hot.